I will say this many times, I have been in the industry for almost 29 years and no matter what, when I learn something new every day its a good day and this is one of those days. I got to help a customer do a migration of a file server from one domain to another. Like you would expect when we moved it lost all its NTFS permissions. Well just going through the GUI and changing the permissions was working ok but ran into some issues and that’s when I had to flip into command line. The topic for today is setting permissions via command line. I know many of you will just close this out now, but for those that do not know, please continue to read this. Well enough of that, let’s get into the tech.
I am not going to go into super details about all these commands but trust me you want to read up on them and understand them. Just an FYI, might be best to always run these as administrator and not in the normal user context.
The first command which I ended up doing was doing a reset of the folder to the default permissions. I ran into a few issues, and I felt it was best. I used icacls. In the following example command
icacls "E:\Path\To\Folder" /reset /T /C /Q/reset - reset flag
/T - For all folders and sub folders
/C - Continue on error/Q - suppresses success messages.
This was super handy because it gave me back everything to the default state.
The second command I utilized was takeown. Very powerful command and worked like a charm. In the following example I am going to do a take ownership
takeown /F "E:\Path\To\Folder" /R /D Y/F - which calls the path.
/R - is for performing a recursive command on all folders and files
/D Y - Suppresses the confirmation prompt by adding the Y
The only issue with the above command it will actually make the account that you are logged onto as the owner, which I for one do not want my admin account to be the owner. How do we fix that? With an additional switch. Notice in the below command you will see the /A. The /A command indicates you want the administrator’s group to the be the owner. I am more of a fan of this for many reasons access for the administrators if they need it.
takeown /F "E:\Path\To\Folder" /A /R /D Y
Getting back to icacls below is another command that will add the security group to the folder and sub folders. In the below command again using icacls
icacls “E:\Path\To\Folder\*” /grant sec_edtechjeff_IT:M /T /C /Q/grant - to say what you are doing with icacls
next calling out the security group
:M notice the :M after the security group that is setting that group and giving them Modify access rights.
/T - For all folders and sub folders
/C - Continue on error
/Q - suppresses success messages.
To this point all was well and good, but I did notice on the output of the icacls commands that some files could not be found. Well the funny thing about it, I could browse to the file either by the GUI or by command line and see the files. At this point I was scratching my head. I did ask a user if they could see and access the files and they said yes, which was good but still something was still not right. Via the GUI I right clicked on the file and brought up properties to see if I could view the security permissions. See below anything funny? Its missing its Security Tab. What now?

Well one more item I did notice was the following. Notice the path does not look right. This got me to thinking. This is looking like Long Path File Name issue. Read that article and it can explain more, but in short Windows can only see so many characters which is 260. The path file along with the file name was way more than 260 characters.
Now what? users can access the files, and I can see the files also but that is not good enough. There is couple newer, powershell tools that are out there. One of them is Set-Acl and the other is Get-Acl. To be honest I am still figuring these out. These are great to look and also set permissions on files and folders. Again, not going to say much more about them but definitely worth more of my time to get a better understanding.
The last command I am going to show you is the one that helped bring sanity back for me. I used the command NTFSSecurity. In order to run this, you need to load the modules
Install-Module -Name NTFSSecurity
Import-Module NTFSSecurity
Now that you have done so you can look at permissions of a folder. The following command is pretty simple and that is one reason I like it.
get-ntfsaccess -path c:\windows | select-object -property account, accessrights
-path – path to the fileselect-object -property account, accessrights – This is just allowing you to select the fields you want to view
Running this command gets you this output

Not only did this prove to myself that the folder was getting it, but I also then had to make sure the actual files were getting them and with this same command you can do the same thing. Notice in this command I just continued the path to the file I wanted to look at.
get-ntfsaccess -path c:\windows\explorer.exe | select-object -property account, accessrights

Going through this journey was very helpful for me and did teach me a little bit more about more efficient ways to deal with permissions. I will never say I will be an expert at any of this, but I like to share my pain that I had and maybe it wont be bad for you.
One other side note I would like to point out. When setting permissions, and this one really made me feel like I have only been doing this for 29 minutes instead of 29 years, was manually setting NTFS Permissions. When you go into advanced and pick the account you want to have permissions, notice the check box at the bottom of the picture.
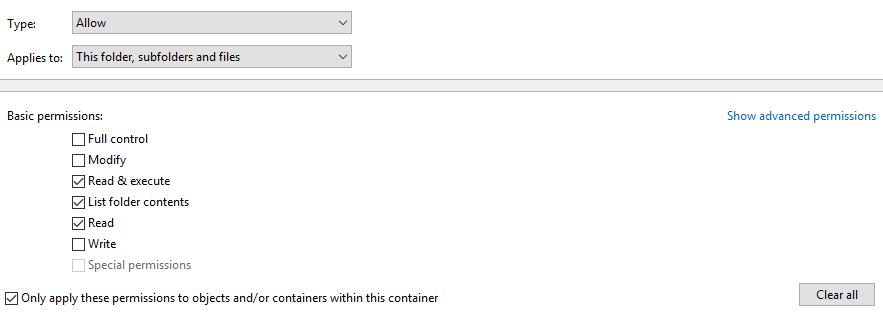
What I found out and this one I really wanted just to call it a day and start a new profession was if you click that check box and if you set the permissions to go to folders\subfolders and files the permissions will only go to that folder only with that box checked. I normally do not set permissions though the advanced but for this instance I did and to be honest I read it like it needed to be checked. Little word the wise if you want it really to go to all folders, subfolders and files. Save yourself a few headaches and don’t check it.
